
My second project on the floor loom was a set of 100% cotton dish towels. I like making towels because they are practical, make good gifts, and are still functional even if they have mistakes or turn out wonky. Towels on the floor loom can be wider than towels made on my 15″ wide rigid heddle loom, and can have a more complicated weave pattern.
I measured out the warp yarn using my new warping board at home, using white with enough length for four towels 22″ wide on the loom. That seemed too wide, but they will shrink after washing, so the final width will be less. The recommended density for the yarn is 12 ends per inch, so I had to measure out the yarn 266 times around the warping board. That is 22″ X 12 ends per inch, plus one extra on each end.

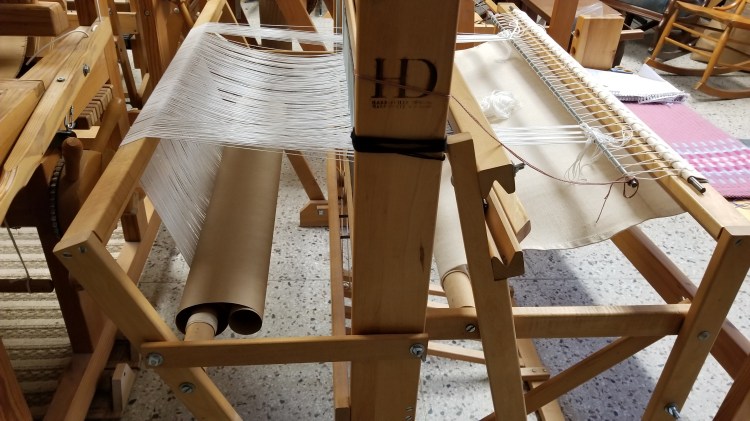
I brought the bundle of measured out warp yarn back to Tangles to Treasures so Torri would available to guide me with “warping” the loom. In the photo below you can see each end threaded through a slot in the reed.

The next step was done from the back of the loom. Each of the ends was threaded through the “eye” in a heddle, the thin metal strips hanging vertically and attached to one of the four harnesses. This part is very putzy but is important as it makes the pattern.

After all the ends were threaded through the heddles, they were tied on to the back and wound around the back beam. You can see the warp yarn wrapped around the back beam with some brown paper in the next photo from the side, and also the opposite process of tying the other ends on to the front.
Once the project was “warped”, I was excited to bring the loom home and continue with the weaving there. It would have fit in the back of our pickup truck, except that the big hitch for our fifth wheel trailer is bolted to the middle of the truck bed. It can be removed, but it is a hassle and heavy and Wayne did not want to do that. Instead we used my cousin’s more beat up truck. He helped Wayne lift the loom up into the truck bed and tie it down for the 12 mile drive to our house. Wayne and I were able to get the loom off the truck and in the house. It is not very heavy, but it is awkward. We placed it in the living room behind the sofa so I can see the TV and out the windows towards the lake while I am weaving.
Torri had made some dish towels last year using a variation of a twill pattern that I admited, so she showed me how to create that for my project. Getting a certain pattern involves both the order in which you thread the ends through the heddles, and which harnesses are up or down as you weave the weft rows. There is a standard way that weaving patterns are communicated on paper or electronically. I found a free website, http://www.treadl.com, where you can play around with making or documenting a pattern. Honestly this is still confusing to me, so I understand that it is gibberish for anyone who has not done weaving with multiple harnesses before. Following is an image of my pattern in treadl.com, showing how to thread the heddles, which pedals to press in what order (which then lifts the harness it is attached to), and what the pattern will look like if you do this.

One repeat of the pattern includes 20 rows. Torri wrote out a chart showing the treadling for the pattern on a scrap of paper and taped it on the loom where I can see it while weaving. Each single number represents a pedal, each group of two numbers means two pedals pressed at the same time. There is post-it note strip that I can move along as I complete each subset of four rows. I have seen notes like this on Torri’s weaving projects and honestly they did not mean anything to me until I actually did the weaving myself.

The following photo shows hemstitch at the beginning of the first towel and two repeats of the pattern.

I wanted to do the second towel with a rolled hem (folder over and stitched down) instead of hemstitch and fringe. Torri gave me some thinner yarn, almost like thread, to use for weaving some rows at the beginning and end of the towel so it will fold nicely without being too thick. The color was darker blue than what I was using for the weft yarn. The next photo shows the end of the first towel with hem stitch at the bottom, some spacer rows that will be fringe on the first towel, the rows of darker thinner yarn for the hem of the second towel, and one repeat of the pattern at the beginning of the second towel.

In the middle of weaving the second towel a leather cord used to hold together two wood parts of the loom broke. That was a problem as the loom will not work with a broken harness cable. I was able to figure out a temporary solution, but realized that some refurbishing of my loom would be a good idea when this project was finished. That will be a topic for a future post.
When I got to the end of the second towel, I got mixed up when weaving the rows of thinner yarn for the hem. I alternated pressing pedals 1 and 2 together, and then pedals 3 and 4 together, instead of alternating 1 and 3 with 2 and 4. What happened was that the yarn went over and under every two threads, instead of every other thread which makes a looser weave. You can see this in darker blue section on the photo below. I noticed the mistake after I was almost done with the hem rows. I should have undid it and started over but I decided to see how it worked for a hem, compared to the way it was supposed to be. Or maybe I was just being lazy and hoped it would be OK.
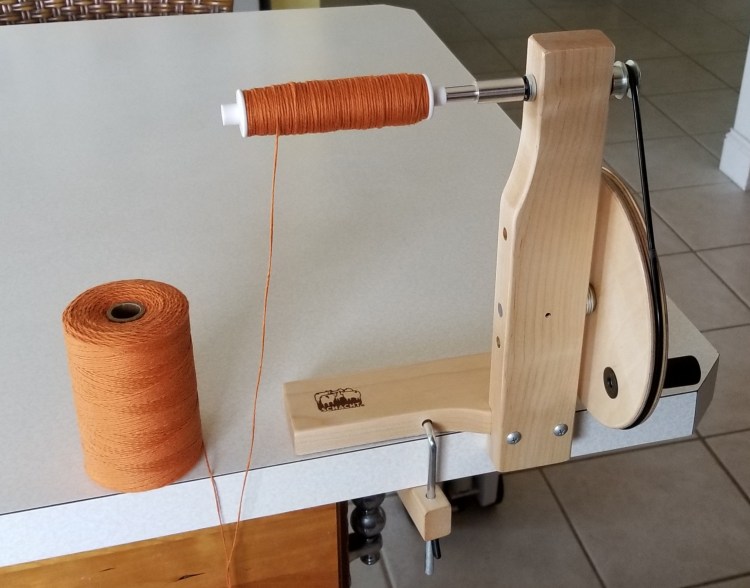
The first two towels were blue. The third towel was going to be orange, so I used my new bobbin winder for the first time at home.
The next photo shows the beginning of the orange towel, and also the end of the second blue towel, where I used the wrong weaving pattern for the thinner dark blue hem rows. There is also a spacer section in between that will become the fringe for the orange towel.

When I got towards the end of the fourth and last towel using green yarn, I could see it was going to be shorter than the other three as I was running out of warp yarn. I wove a little bit farther than I should have. The back end of the warp yarns were too close to the heddles, so when I pressed the peddles, it was hard to get the weft yarn between the correct warp yarns. I ended up removing some rows and was able to get the towel finished. Torri had showed me when to stop on my first project, but sometimes you have to make a mistake in order to remember the right way.
Three of the towels had hem stitch and fringe to finish off the ends. I have been confused by hem stitch all of my two year weaving career. I think it is because I seem to be directionally challenged. The instructions will be for one direction and one end of the weaving. But sometimes you need to reverse the instructions to do the hem stitch from the other direction, or at the other end of the towel. I think I finally got it this time. I like doing hem stitch once I figure it out and get in a rhythm. One reason I like the hem stitch finish is that it is complete, there is not any more hand work other weaving in the ends. I think the rolled hem looks nicer, but it is more work.
After removing the project from the loom, I zig zagged the end of the plain weave hem rows on the second blue towel with my sewing machine, so they would not come undone when I cut the towels apart and before I could get the rolled hem done.

After discussing with Torri, we agreed that the hem rows with thinner yarn that I wove with the incorrect pattern might work but not look good. The next photo shows the towel with the woven hem rows folded over to show both ends. The one at the bottom is the incorrect one.

To fix this problem I did a hem stitch at both ends and then removed the thin rows of yarn.

I measured the length and width of each towel at this point. They were all between 20 and 21 inches wide on the loom, and between 28 and 33 inches long. After weaving in all the loose ends and fixing a place where the yarn had snagged, I ran them through the washing machine and dryer with a load of laundry.
The average final width was 17.6″ which is 80% of the original width on the loom of 22″ before weaving. The length of each towel also shrunk by about 20%. The longest one was about 26″ long after washing, the shortest one when I ran out of warp yarn was closer to 23″.
I started with 4.5 yards of warp, which is the maximum length on my warping board. That was supposed to work out to 18″ of loom waste on the ends, plus 36 inches for each of four towels, including the fringe or hem. I wove the first three towels too long, so the last one was shorter. I will be able to use this information to make at set of more evenly sized towels next time.


There are infinitely many possible pattern and yarn combinations for weaving. Dish towels are a good way to experiment, and figuring out weaving patterns is a good way to keep my mind active. I look forward to making another set of towels with a different pattern, after I do a little refurbishing on the loom.

Oh, my goodness! I love that pattern!
LikeLiked by 1 person
Thank you!
LikeLiked by 1 person
You are very welcome!
LikeLike
You are amazing! The towels came out beautifully. I like the patterns and the colors. I like your sentence which states sometimes you have to make a mistake to remember it right. So true – for many things! It is wonderful that your husband supports your hobby – borrowing an old truck and bringing the loom back home. I wonder what people thought who saw you go by. Great job! Anything new on your Etsy shop? Please remind me of the name. I thought I marked it as a favorite, but apparently I didn’t.
LikeLike
Thank you! I am very grateful that Waynr is supportive of my hobby. And also does not give me a hard time about finding a mocha when we are on vacation! My ETSY shop is called LakesCountryHandmade. I have not put anything for sale lately, but I hope to.
LikeLiked by 1 person
Thanks! I have marked it as a favorite now.
LikeLiked by 1 person
The towels turned out beautiful, Meg!
LikeLiked by 1 person
Thank you!
LikeLiked by 1 person
What a beautiful pattern! I am so impressed by your skills!
LikeLiked by 1 person
Thank you! I am still learning and it helps that I have a willing mentor to guide me.
LikeLiked by 1 person
I think the towels look great! And you’re right, they will make terrific gifts!
LikeLiked by 1 person
Thank you! Yes everyone can always use a new towel!
LikeLiked by 1 person
Dish towels are a perfect weaving project, like you said, everybody needs one, and you can really figure out a lot of the geometry to get more precise on the size of projects, and practice new patterns. That is cool to see the special language or method for communicating the patterns. I aspire to find the head space you are demonstrating to work on my projects. Not there yet, maybe yet will happen. you are able to spend enough time on it to learn new things, practice, and remember them.
LikeLiked by 1 person
Your head is full of more things at this time than mine!
LikeLike
There was a comment on this blog from a woman with handle/name “Julia”. She looks youngish, with fluffy or frizzy short blonde hair. Can’t tell if that is a current or vintage photo. Do I know her?
Julia Earle was working on a knitting project during the Quarterly Biz Mtg at church on Thursday. I asked her about it. It was the first time she had used a fiber with some alpaca, I believe it was, mixed in with the wool. It was very soft. The color was variegated, shades of pink and plum. She was making a scarf with a rather complex pattern.
*Betsy *
Cell: 612-412-3225
Email: betsyclarke77@gmail.com
LikeLiked by 1 person
The Julia who replied is a blogger who retired and is living with her husband in her RV.
LikeLike