
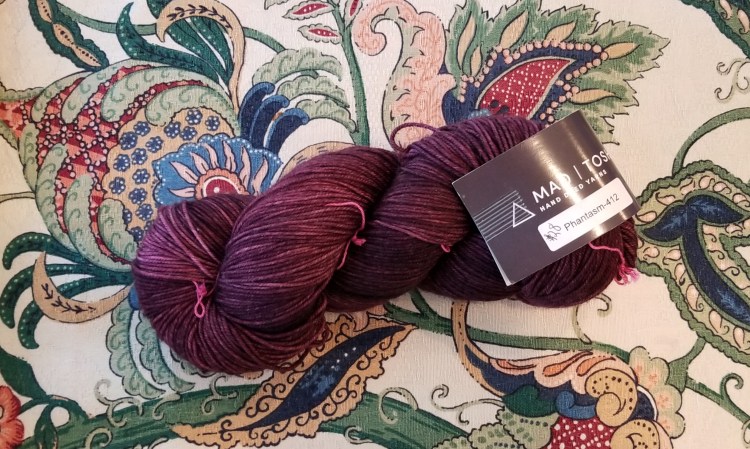
While we were in Arizona over the winter I knit another pair of socks using Madeline Tosh Twist Light yarn. This is the same merino/nylon blend and the same needles I used in two previous pairs of socks. I like this yarn and I wanted to see how variations in the pattern would affect the fit.
The purple pair I knit before were cuff down with an afterthought heel. The off white low cuff sneaker style pair were also knit cuff down, but with a Fish Lips Kiss short row heel. They both had 64 stitches around which turns out to be a little too big for my narrow foot. At the time I knit those, I was still getting comfortable with the construction of socks, and I did not understand how to get them to fit. There are suggestions for how many stitches to use for a ladies sock, but apparently my foot is not average.
This time I started at the toe, knitting two at a time. The other pairs are a little too loose, especially in the ankle, so this time I used only 56 stitches around instead of 64. I came up with that by measuring the other pairs, and by looking at my cardboard foot template as I knit the toe.
In order to knit two socks at a time, I had to divide the skein of yarn into two balls. I used my ball winder to make one big center pull ball, and then used the outside end from that to wind another ball, until the first one weighed half of the original weight. Interestingly, the first larger ball was very dense. When I wound the second ball with half of the yarn from the first ball, it looked a lot bigger and was less dense than what was left of the first ball, although they weighed the same.

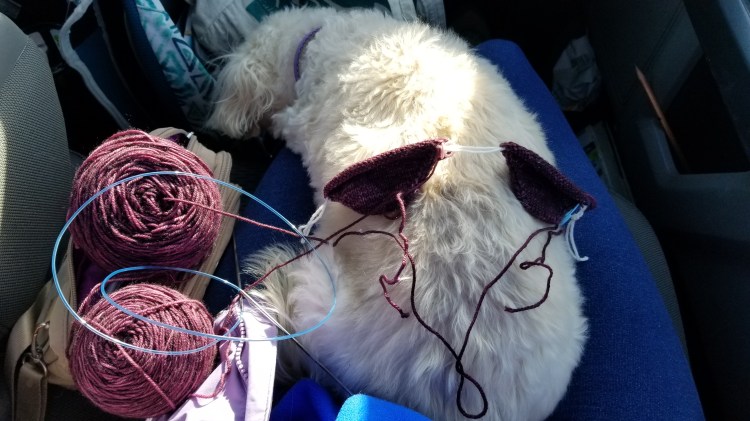
I got a good start on this project knitting in the car on the way to Arizona, with the dog napping on my lap.
After getting some of the toe done, I came across a sock pattern called Rayanne Socks with a cable design going up one side. I decided that would be a good challenge and look interesting with the variegated yarn. The pattern uses two different yarns, alternating every other row, but I used the same yarn for every row.

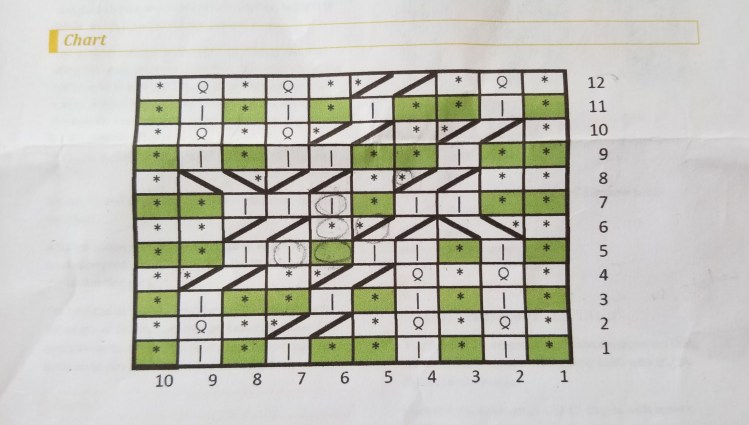
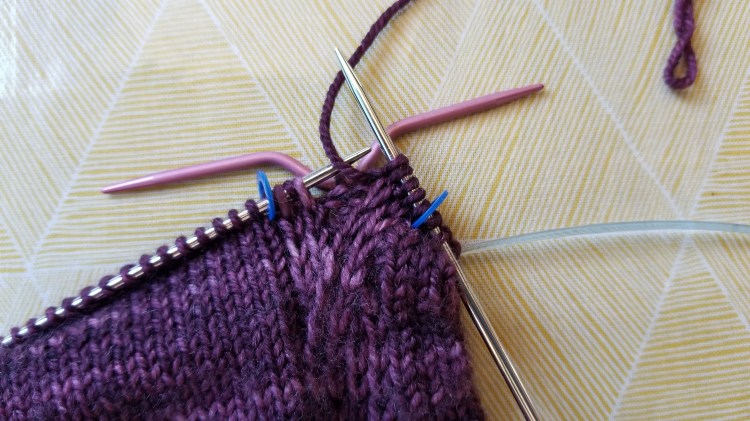
A cable pattern in knitting uses a small extra needle with a bend in it to hold one stitch while you knit the next stitch, and then you go back and knit the stitch on the cable needle. The stitch on the cable needle can be held in back or in front as you work the next stitch, which results in swapping the position of two stitches and gives an overlapping curving pattern. The Rayanne sock pattern has a chart with 12 rows showing the pattern. Within the 12 rows of the pattern are three different variations of cable stitch indicated by slanting lines and an asterisk. It looks intimidating at first, but I got the hang of it after several repeats. Following is a photo showing the chart.
This pattern required a lot more attention and ways to keep track of things than I usually need. I had stitch markers at the beginning and end of the cable pattern on the needle, a stitch marker at the beginning of the round, the row counter, and the cable pattern chart.

Usually I would stick the cable needle through the toe of the sock in progress until I needed it again. One time I could not find it, and looked all around on the floor, in the cushions of the chair where I usually knit in the RV, and in the front seat of the truck. I could not find it anywhere. I thought I was going to have to buy a new one and even checked the knitting aisle at Walmart when I was there for something else. Walmart has some yarn and knitting supplies, but they did not have a cable needle. I knit a couple of rows using a straight double pointed needle I had on hand, which actually worked pretty well. Then I found my missing cable needle. It was pushed all the way inside the ball of yarn! The cable needle is almost the same color as the yarn and about the same length as the diameter of the ball of yarn at that time. I got a laugh from that and was very relieved to have it back.
I tried another type of heel that I found on Pinterest for this pair of socks. The Fleegle Heel involves increases on each side of the heel while continuing to knit the stitches on the front of the foot, until you have double the amount of heel stitches that you started with. Short rows are then used to decrease the heel stitches back to the original number. The pattern is free on the author’s blog and on Ravelry.
While knitting the increase rows for the heel, I was also continuing the cable pattern on the front. I made a chart to keep track of which row number of the heel I was on, which row of the cable pattern I should be on, and how many total stitches I should have. Add that to the list of ways to keep track of things for this pair of socks.
My row chart came in handy when I had a knitting crisis that was my own fault. I know better than to try to knit on a complicated section of a pattern when the light is not good, I am tired, the TV is on, and the dog is on my lap. In this case it was late in the evening with the TV on, and the dog was wining to get on my lap. I should have asked Wayne to take care of her, but instead I leaned over across my knitting, picked her up and plopped her on my lap ON TOP OF THE KNITTING. Then when I tried to extricate the knitting out from under her, it was tangled in her feet and tail and she growled at me. Wayne reached over and lifted her off, but in the process one of the needles came out of the knitting and a couple of stitches started dropping back to earlier rows. It is easy enough to put the needles back in if there is just plain knitting. But this was the section with the cable pattern. I was in tears at this point and set the whole thing aside until morning.
I was in better shape the next day with a good nights sleep and natural light. However I had to rip the knitting back several rows to get to a place where I could make sure the cable pattern was restored correctly on the needles. There were other times when I had to restore dropped stitches or reknit sections and it is likely there are a couple of mistakes sprinkled throughout the sock. The cable pattern, along with the variegated shades of color in the yarn are good for camouflaging any minor problems. No one will know.
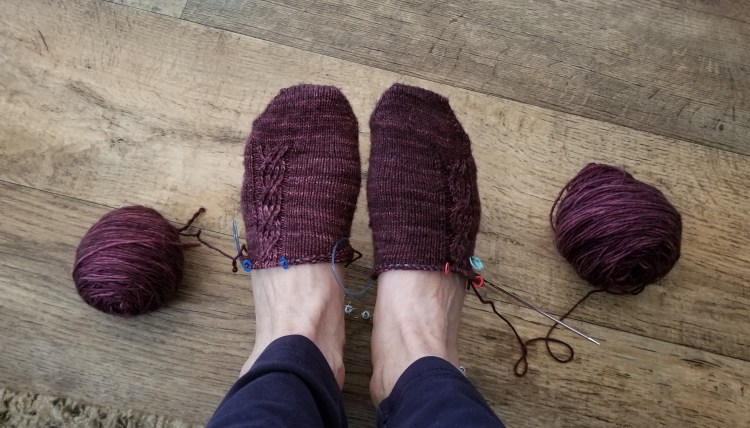
Following is a photo with the sock in progress on my foot after most of the heel increases had been completed. The pattern says to us “lifted” increase, but instead I used “knit in the front and back”.
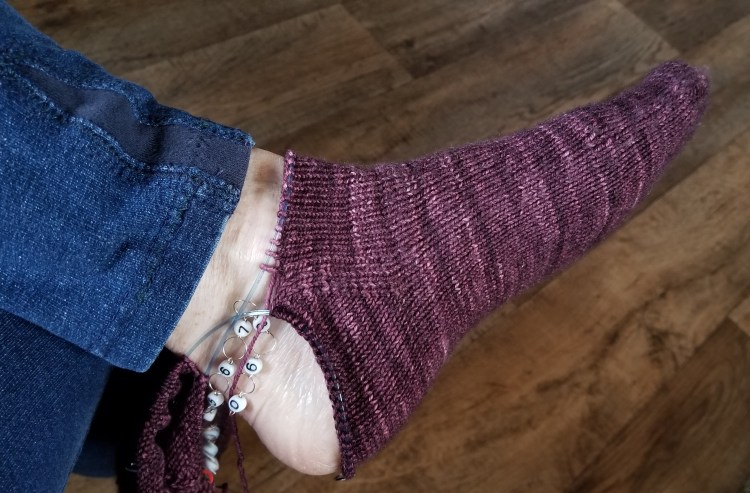
You can see in the photo my leggings that were too tight in the ankle. First I had just slit open the side hem and worn them for a year with the fabric at the ankle flapping around. Later I sewed a piece from an old pair of sweat pants in the space with zig zag top stitching. It is not pretty but works. Now there is a hole near the knee, and the fabric is starting to wear out around the inside of the thighs. Maybe time to get a new pair.
The Fleegle heel pattern has instructions for avoiding a hole in the corner that can be applied to other types of sock heels. It worked out very well. Following are photos showing the completed heel from the side and back.
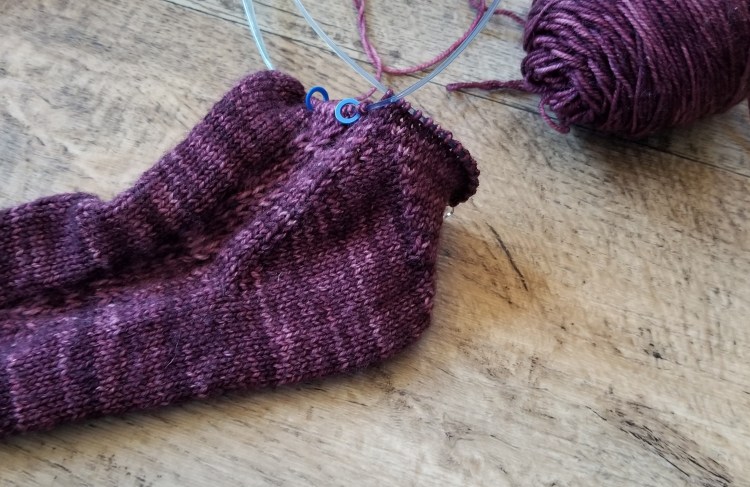

I like this heel pattern. There are not any funny gaps or holes at the corners of the heels. The Fish Lips Kiss Heel pattern is pretty good too as far as no gaps or holes, but you do have to pay attention and pull the yarn snugly at a couple of key points.
When you are done with the heel, there are two extra stitches so you have to decrease one more time on each side to get back to your original number. In order to do 2×2 ribbing, I needed to have the total number of stitches divisible by four. My sock was barely big enough around, so I did not want to decrease the two extra stitches. Instead I added two more to get up to 60 stitches around for the ribbing. I probably should have had that many stitches from the beginning but it was too late for that at this point.
It was a relief to be done with the cable pattern which required more concentration than ribbing, and was more prone to mistakes. The ribbing is mindless.

I changed to double pointed needles for the last step, using Jeny’s Suprisingly Stretchy bind off.

It was interesting trying out the cable pattern going up the side of the sock, but I am not sure it was worth the extra energy required. I would most likely be wearing these socks with pants, so the pattern will not show anyway.
The other socks I made with the same yarn and needles seemed too loose, but this pair is a bit too tight. The yarn is the same as the other pairs in a different color, but does not feel the same. If I could start over I would use 60 stitches around instead of 56. I also made the foot part a bit too long, although there were some very specific instructions using the your actual row gauge to determine when to start the heel.


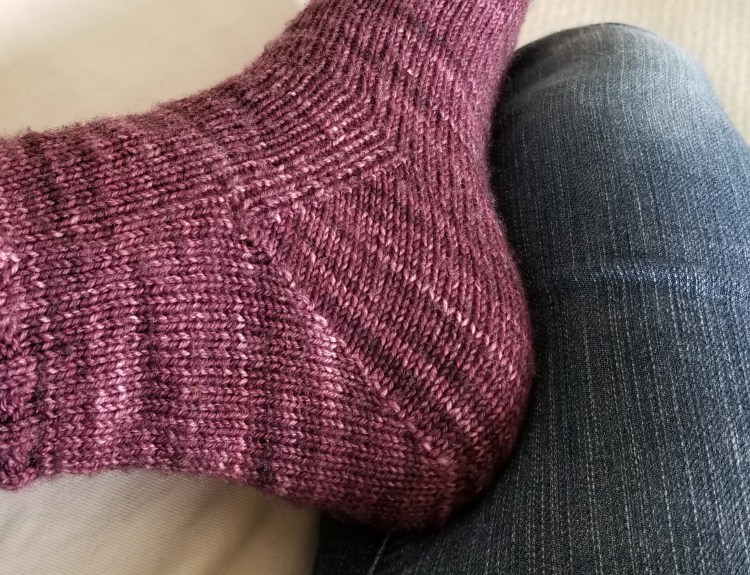
Following is a photo of the three pairs of socks made with different colors of the same yarn. I liked knitting the Fleegle heel, but I wonder if the way the heel slants back instead having more of a right angle contributes to it feeling a bit too tight. Maybe the cable pattern pulls the stitches closer together to make it tighter. Or maybe it feels tight because I used 56 stitches instead of 60. There are so many variables between the yarn, the heel pattern, and the stitch count it is hard to know what is causing what. Maybe my next pair will be the perfect combination.


You are truly a dedicated artist and a very detailed oriented person. The socks are beautiful! They coordinate with the color of your couch. You much like the color. And I like the pattern on the sock. I often wear just socks around the house, so if you’re like that, you can enjoy seeing the pattern. I certainly understand about being tired and working on a project. A new day brings new energy and a renewed focus and determination. I know from experience. 🙂 Hope you have a nice Memorial Day.
LikeLiked by 1 person
Thank you for your kind comments as always. Hope you have a good Memorial Weekend too. We spent all day today weeding and preparing a small raspberry bed and area for planting vegetables, and the rhubarb patch. Not my favorite activity but I do like having the fresh produce later. I used some waste wool from Shearing Day for mulch. Watch for a blog post about gardening in upcoming weeks!
LikeLiked by 1 person
These are so beautiful that it is a shame to cover them up by wearing shoes.
LikeLiked by 1 person
Thank you!
LikeLiked by 1 person