
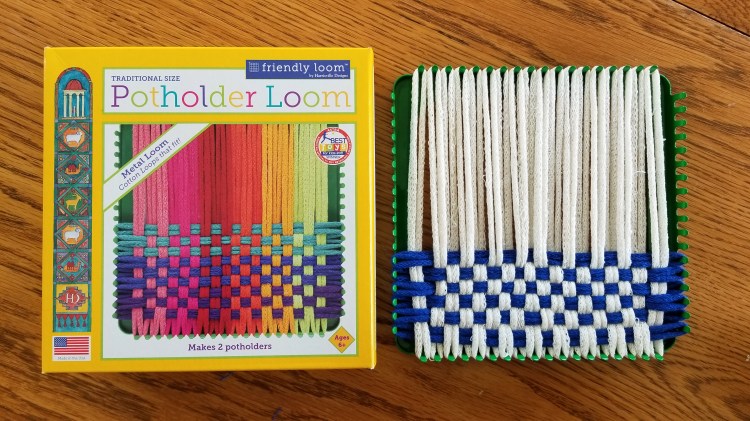
I get regular ads from Purl Soho for potholder looms, like the kind I used as a kid. The box says it is for “Ages 6+”, but I have seen Instagram and Pinterest posts indicating adults are making potholders too. They look so pretty! Like dish towels, who cannot use a new one? Don’t laugh, but I ordered one. There were two sizes of the square metal looms made by Harrisville Designs, traditional 7″ x 7″ and Pro size 10″ x 10″. After looking at the potholders I always use in my kitchen, I decided to go with the smaller one. It came with one bag of random colors of loops, so I ordered additional bags of white loops and blue loops. Later I ordered three more bags of loops in green, peacock and tiger lily.

One of my memories of using a potholder loom in my youth was that some of the loops were too small to stretch across from one side to the other. I must not have been the only person with this problem since the box advertises “Cotton Loops that fit!”. I don’t know what the loops were made of back in the day, but today they are nice 100% recycled cotton that are all the same size and fit on the loom.
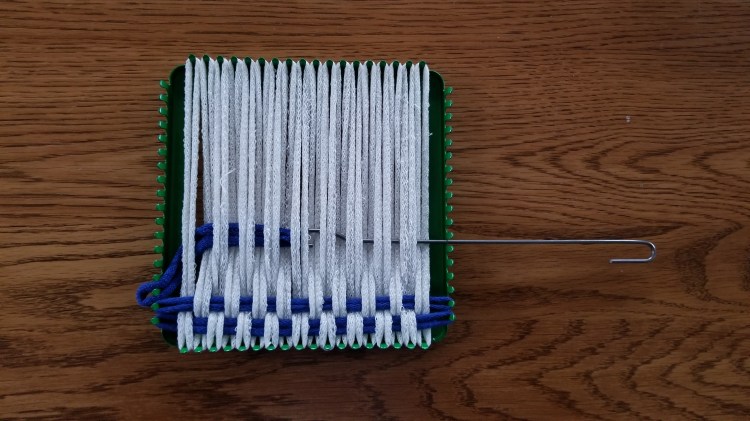
It was pretty easy and mindless to get started on my first potholder, after reviewing the instructions. First you stretch loops across all the pegs in one direction. Then you work the other direction by weaving the metal hook in and out of the loops on loom and pulling a loop through.
Following is a photo of the box the loom came in, next to my first potholder in progress.
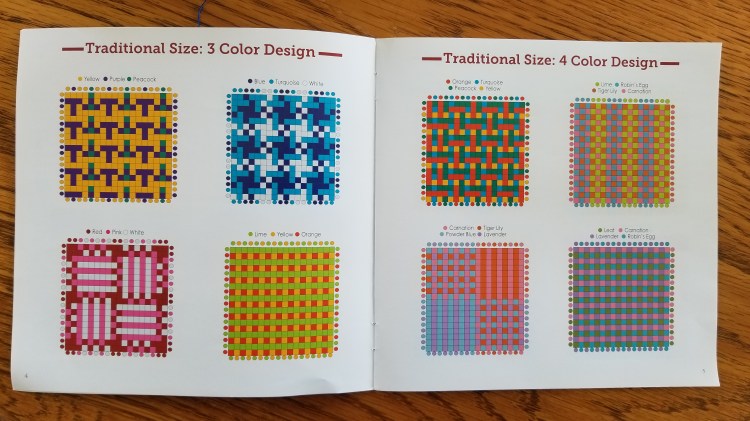
The booklet that came with the loom has some designs you can try using two, three, or four colors of loops. You need more loops in each color than what comes with the kit to make some of these patterns.
It only took about 15 minutes to finish weaving the stretchy loops on to the loom in both directions. It could have been even less actual clock time, but I did not do it all in one sitting.

To finish the potholder, you start at the corner and pick the first loop off the peg with the crochet hook. Then you pick up the second loop and pull it through the first loop. You continue around picking up the next loop and pulling it though the previous loop until you get all the way around.

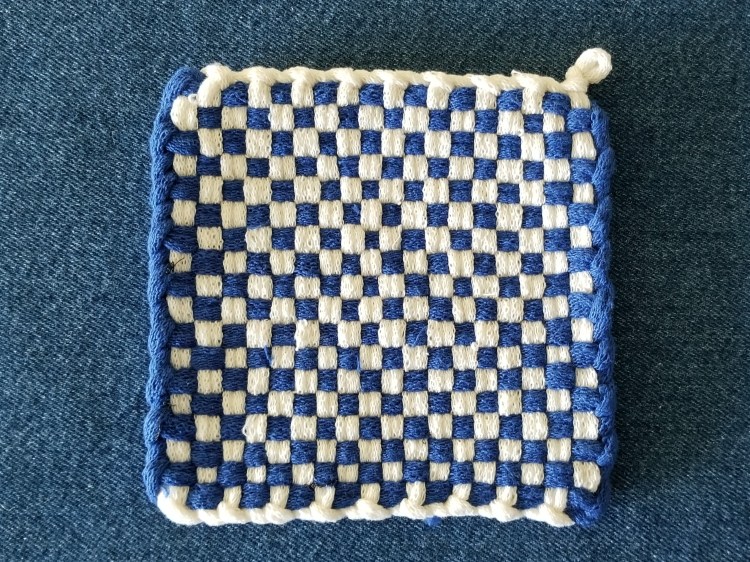
And Voila! A finished potholder. It is closer to 6″ x 6″ after you remove it from the loom and the tension is relaxed. Apparently some people prefer the bigger size, but I always reach for my smaller potholders.
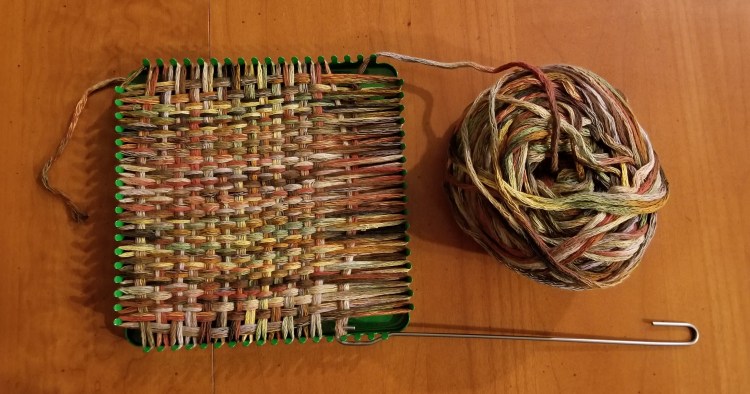
You can weave with yarn on this loom also. Torri, my expert at all things weaving friend, showed me how to wrap some yarn back and forth across the pegs on the loom with a continuous strand for the “warp”. With the yarn still attached to the skein, I then wove the long metal hook in and out of the warp yarn and pulled a length of yarn back through for the “weft”, continuing across the pegs without cutting the yarn. The cotton and acrylic yarn I used, Berroco Espresso, had many plies and no give. The metal hook kept catching in the middle of a strand of yarn. Also, due to the lack of stretch, it was hard to get the metal hook through the last couple of rows without the warp yarns popping off the pegs. I ended up estimating how much yarn I needed, cutting it from the ball, and then using a yarn needle to weave it through. The finishing process was the same as with the stretchy loops, using the crochet hook. I would probably not use this yarn again on the potholder loom. I am not sure I would make a potholder again with any yarn. The stretchy loops work really well, so it makes the most sense to use those.
The next photos show the potholder with cotton and acrylic yarn in progress and then complete. Note that getting photos showing the colors accurately is harder than actually making the item. The lighting conditions are constantly changing, and I cannot go back and re-take photos of a project in progress after it is complete. The actual color is somewhere in between the darker in progress photo and the more washed out looking completed project photo.

One reason I decided to buy the potholder loom is that I thought the potholders would make nice gifts, and also might be a good project to bring to Arizona for our winter snowbird trip. I can’t bring my entire craft stash with me to Arizona, so I have to plan carefully what projects I can make with efficiently packed supplies. Last year I brought my 15″ Rigid Heddle Loom, but I did not use it as much as I thought I would. Also after my experience last winter with the craft fair at the RV Resort, I am thinking about what or if I want to try to sell a few items there this coming winter. Not sure if the actual shop will be open, or if they will do the outdoor craft fair instead. Now I know that people in Arizona do not want wool hats, even if Minnesota is their permanent residence. Potholders are quick to make, and might be the right kind of thing to sell if I decide to participate in the craft shop or fair next time.
After making four potholders with the stretchy cotton loops, and one with yarn, I put the potholder loom away for now. My next project is going to be a cotton scarf on the Rigid Heddle Loom.


Cool, Meg! What a fun idea after all the planning and excitement of the wedding. The potholder you made from the autumn colored yarn is my favorite! Beautiful! Of course, those are the colors we look best in, don’t we? Enjoy your new project and happy planning for your Arizona winter time. xox. Mary Ellen
LikeLiked by 1 person
Thank you for your comments as always! Yes. those fall colors are good for me too. I will figure out something else to make with that yarn.
LikeLike
I made potholders as a kid. It was fun to remember that. Yours turned out very nice! Love the bright colors.
LikeLiked by 1 person
I have gotten several comments on facebook from people remembering making them as a kid! I like the bright colors too.
LikeLiked by 1 person
Oh how fun!! I bet you could seam a bunch of squares together to make a complimentary rug for in front of your sink. As a child I loved using a loom to make potholders. I did get frustrated at the uneven loops, though. Nice to see that they have nicer kits available.
LikeLiked by 1 person
I like the rug idea! Coordinated rug and potholders. Placemats too.
LikeLiked by 1 person
I remember making those potholders from kits as a child. But mine didn’t turn out anything like yours! Yours are great!
LikeLiked by 1 person
I have gotten several comments from people who remember making them as kids. I think the materials and colors have improved from then!
LikeLiked by 1 person
They have indeed! We had precut materials that we just wove through the looms….Yours look so much nicer! But I’m still thrilled to see this post and have that little “trip down memory lane!”
LikeLiked by 1 person
I had a kit when I was a little girl that allowed me to make potholders. I used up all my loops and couldn’t get anymore!
LikeLiked by 1 person
I got a lot of comments from people remembering making potholders as a kid!
LikeLiked by 1 person