
I have put some time and money into refurbishing the used floor loom I bought last summer at Tangles to Treasures in Fergus Falls. I knew that it was made by Harrisville Designs in New Hampshire, and that it had four harnesses and a 36″ wide weaving width. The only other information I had was that I know the previous owner from the fiber community around here, and she had only used it a few times. It was a very reasonable price, and I am happy I decided to go for it.
After examining the loom at home I could see that it was more used than I had thought. One of the harnesses was warped, one of the original leather harness cables had been replaced with nylon cord, some of the heddles were missing, and the straps used to hold the apron bars were pretty worn out looking. None of these things affected the functionality of the loom, but were factors in the low price which made it a good deal for me.
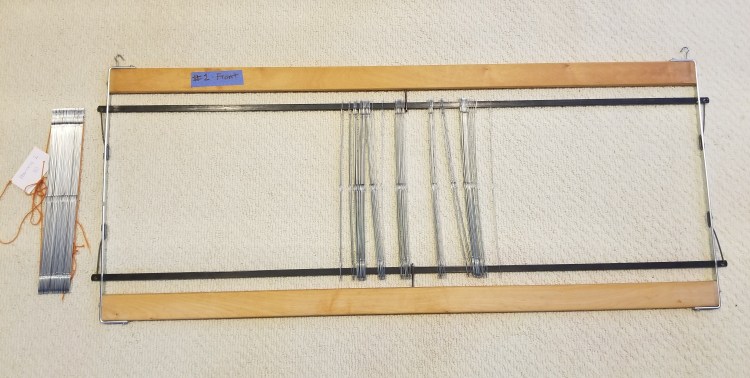
While I was in the middle of weaving my second project on the loom last fall, one of the leather harness cords broke apart. There are four harnesses (a wooden frame) that hold the heddles (wires with holes to thread yarn through). Cords hold and connect the harnesses to the pedals, so they can move up and down to create patterns. One of the other original leather cords had already been replaced by some Texsolv, a special type of nylon cord made in Sweden, so it must have broken before I got the loom.
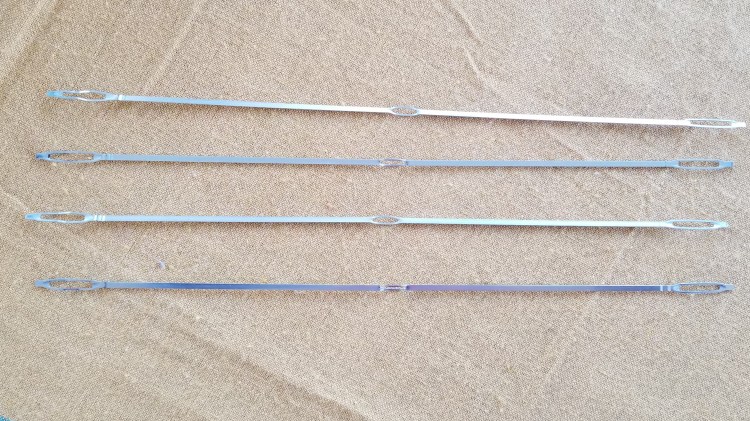
In the next photos you can see three of the four harnesses (the fourth one dropped out of view when the cable broke) plus a close up of the broken cable. There are two intact leather harness cables, one nylon harness cable, and the broken leather cable.
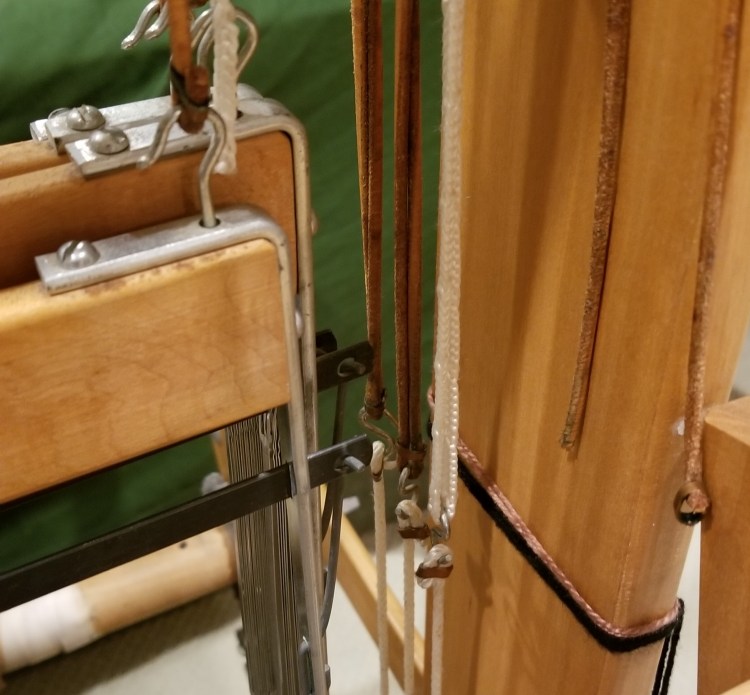

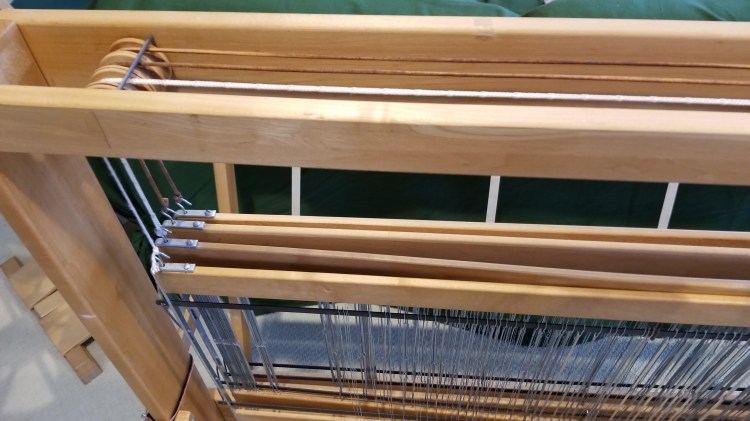
I tried to tie on some heavy string to connect the broken ends of the harness cable, but the leather was very stiff and broke apart in another place when I bent it. Plan B was to remove the leather entirely and replace the entire harness cable with string I had on hand. That solved the immediate problem allowing me to finish the project I was working on, but was not a long term solution. Following is a photo showing the cables holding the harnesses after I replaced the broken leather cable with string.
While researching options online for fixing a broken harness cable and generally refurbishing the loom, I found out that Harrisville Designs could determine when one of their looms was made based on characters stamped on the side. I contacted them to see what I could find out, and got a response within one day.
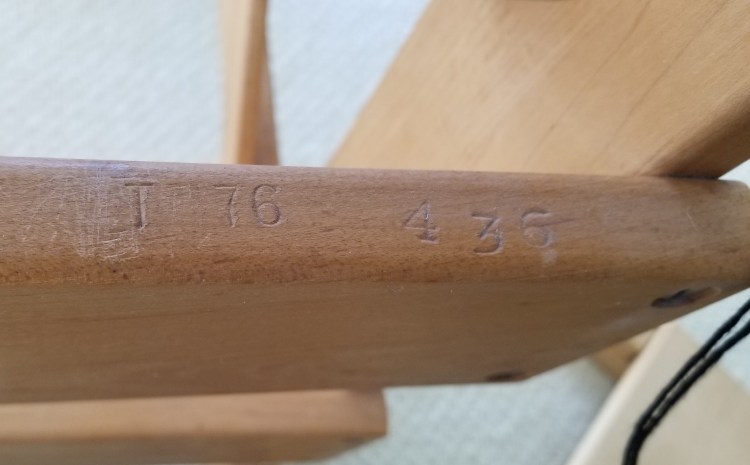
If I had known the code, I would not have needed to contact them. My loom is the 436th “T” model made in 1976. I had no idea it was that old! The other two 47 year old leather harness cables are almost sure to break sooner or later, so I decided that after I finished the project in process I would put new harness cables on all four harnesses.
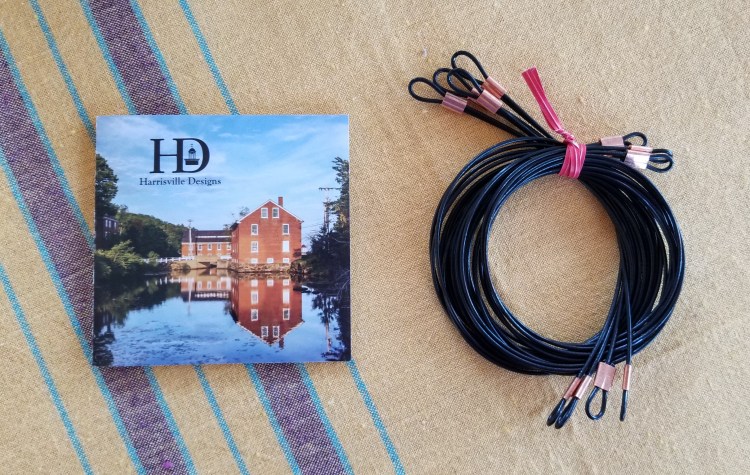
There are options for replacing the harness cables including heavy string, or Texsolv. Harrisville Designs sells a set of replacement cables that are what they use on new looms. I decided to order the nice Harrisville Design cables, which are nylon coated wire.
Textiles has been a part of Harrisville, New Hampshire, for over 200 years. It was a mill town from 1794 until 1970. After the mill closed in 1971, Harrisville Designs began producing quality wool yarn and weaving looms there. It sounds like a good road trip stop to me, if we ever go in that direction.
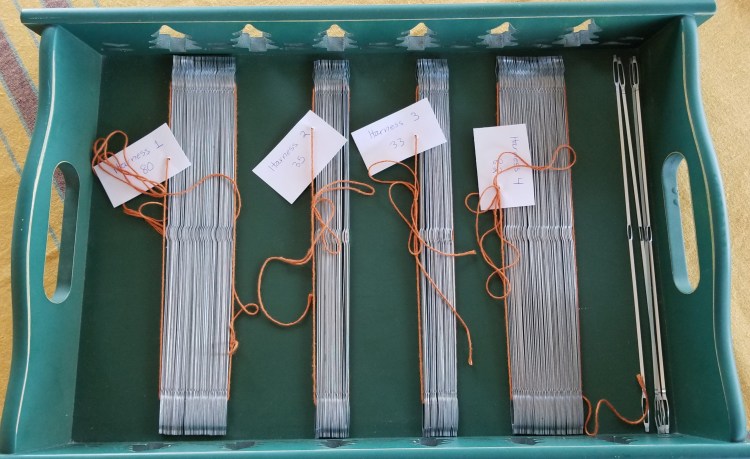
My loom was also missing some of the heddles, the wires attached to the harnesses that warp yarns are threaded through to make patterns. A new loom like mine comes with 600 heddles, or 150 for each of the four harnesses. My loom had 370 total heddles which were not distributed evenly across the harnesses. When we were on vacation in Tennessee last fall I bought a hand woven towel that I want to reproduce at home. I would need 400 heddles to make a towel of the same density, with 100 on each harness. In talking to Torri at Tangles to Treasures about options for buying additional heddles, she remembered that she had some stashed away in a storage area. It turned out she had the actual missing heddles from my loom that a previous owner had removed. They were in a compact bundle that did not look like enough, but it turned out there were exactly the right number to end up with a total of 600, plus four extra.
It was a process to count, sort and arrange the heddles so they would be ready to put back on the loom harnesses. I should have taken a photo of the slippery heddles while I was in the process of organizing them. I did not figure out right away that they have a top and bottom. The “eye” where you put the yarn through has an angle so they catch on each other but which also allows them to be lined up perfectly if you can get and keep them in order. After some frustration and bad words, I came up with a system to string up the correct number of heddles in the right direction so that each harness would have a total of 150. I laid them out on a tray until I was ready to add them to the harnesses.
One of the harnesses was warped. It works fine but I researched methods for trying to flatten it out. Wayne attempted to accomplish this by applying steam with an iron, and then clamping it down while we were out of town for a week at Thanksgiving.
When we got back home the harness was a little flatter, but still warped. I wanted to use it, so gave up on the idea. It looks pretty warped again now with the humid summer air. It is probably a lost cause.
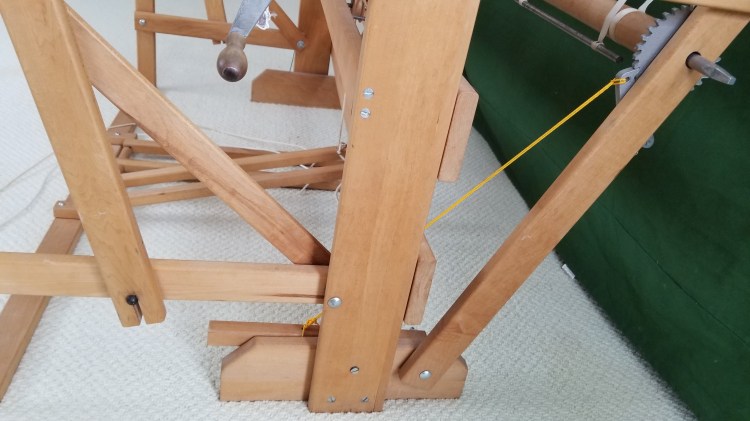
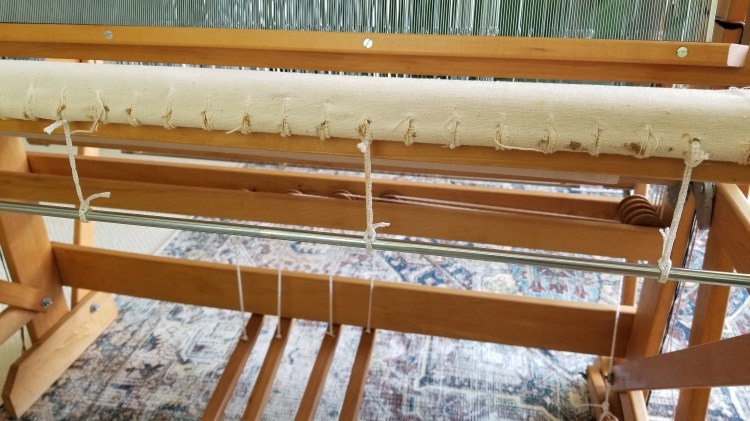
In the following photo you can see some gold cord which is connecting the back ratchet brake to the foot pedal that controls it. That was clearly not the original cord so I wanted to replace it with something white to match the other cords used on the loom.
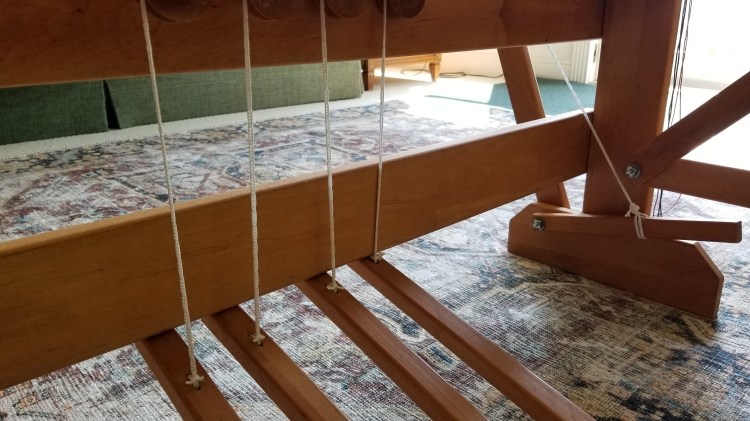
The cords that connect the foot pedals to the harnesses were in good condition, but dirty. I took them off two at a time and soaked them in hot water with Oxy Clean. They were better but were still not pristine. They also apparently shrunk in the washing process. You can see in the photo below that there is a tail leftover where they are tied on to the pedals. After washing, they were too short! I had debated replacing those cords with the nylon product Texsolv, so now I would have to. I was able to order the right amount of Texsolv by the yard to replace the cords attached to the pedals, and also for the brake pedal.

The next photo shows the shrunken and yellow cords replaced with new white Texsolv nylon cord.
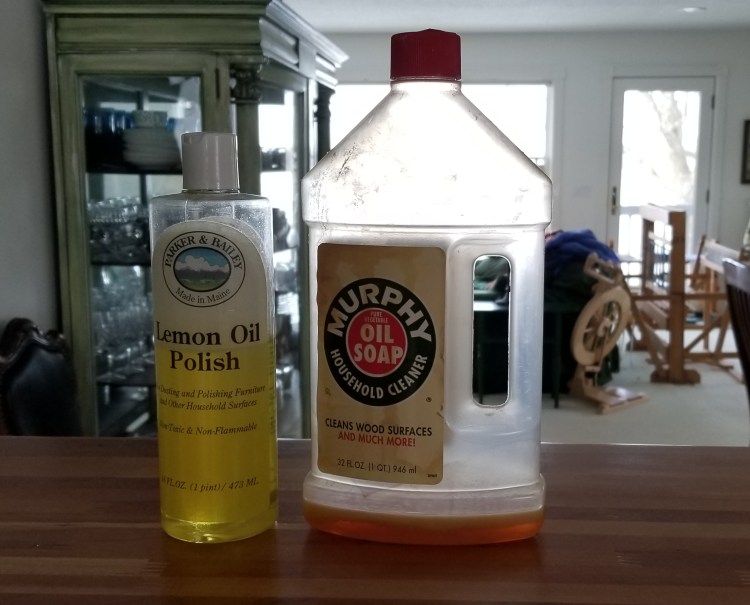
We had some Murphy’s Oil Soap in the laundry room that might have worked to clean, refurbish and preserve the wood pieces of the loom. However the container was almost empty and it is likely very very old. I regularly find food and cleaning products in the house left from my parents that is 5 or more years old. Instead of using that I bought some Lemon Oil Polish and wiped down every piece of the loom. It looked nice and clean after that.
One of the main parts of the loom is a “reed”, a long narrow piece with slots that keeps the warp yarns in order. They come with different densities of slots for different thicknesses of yarn. My loom came with the original “12 dent” reed for projects with 12 warp yarns per inch. I could tell it had seen better days, although it worked. Since I was trying to spiff up my loom, I went ahead and ordered a new 12 dent reed. After finishing a recent project I took the original reed off and found it was pretty beat up. The new one is much nicer and also wider at 36″. The old one was 32″ wide. Following is a photo of the new and old 12 dent reeds. You can see how much nicer the new one is.

The last thing I did to update up my loom was replace the cord connecting the front apron bar to the front apron fabric. It was functional but slid around a lot and I didn’t like it. I had some leftover Texsolv so I cut five pieces, put fray check on the ends to keep them from raveling, and put them on at even intervals instead of the continuous piece of cord that had been used. There is a trick to putting the end through one of the regularly spaced slots in the Texsolv, or bending a piece of it through a slot in the cord to attach it instead of tying a knot. The next three photos show the way I got the loom, the Texsolv pieces cut and ready, and the new Texsolv on the loom.


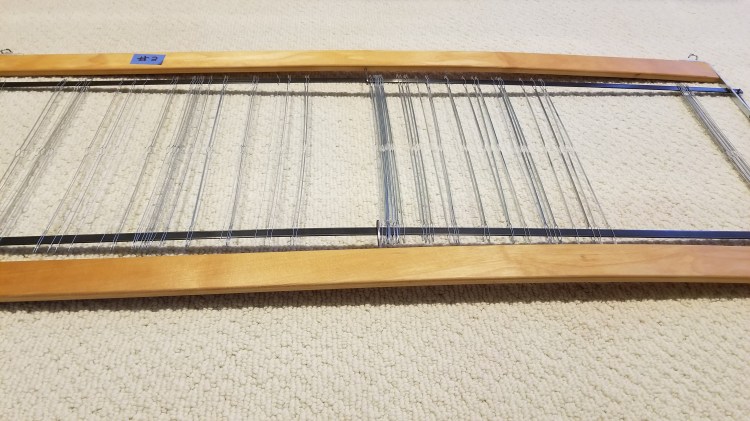
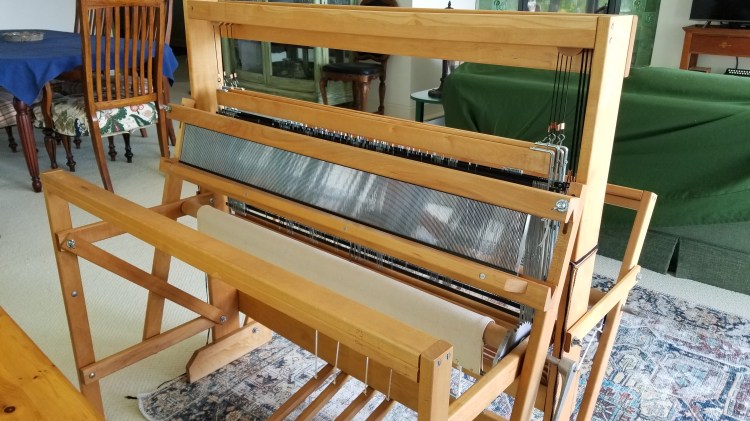
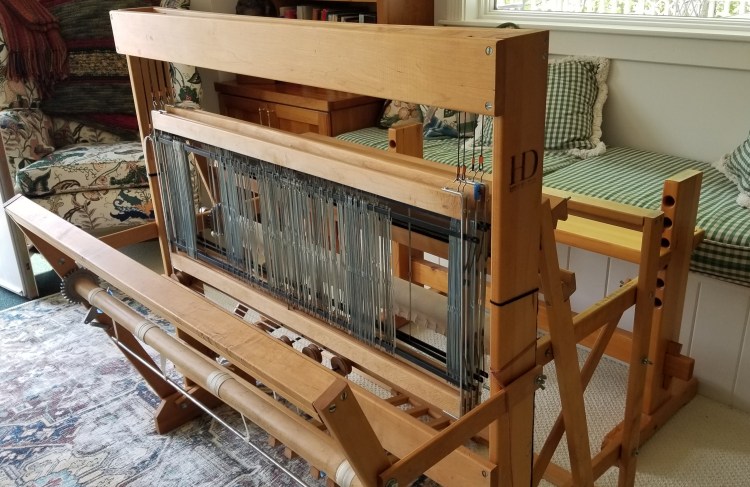
Following are photos showing the front and back of the loom after all my repairs and upgrades. People who are not weavers will have skipped over most of this post by now. And probably no one will be able to tell the difference from these photos, but I can tell.
Having to fix problems and replace parts has helped me understand my loom better, but I still have a lot to learn. The most recent project I worked on had some tension problems that I will write about in another post. I hope that my next project goes perfectly, now that I have my loom all fixed up. That is like thinking that if you get new golf clubs your golf game will be perfect. I know better, but I still think the effort I put in fixing up the loom has been worth it.

It all sounds so complicated, Meg, but I’m so impressed that you knew what to do to make it new again! Happy weaving.
LikeLiked by 1 person
It was all a mystery to me until I started to actually use the loom. The various parts make more sense after having a few weaving projects under my belt. Thanks for reading and have a great day!
LikeLiked by 1 person
I didn’t realize maintaining and repairing a loom was so much work, but it makes sense once I think about it. Good for you for knowing how to do it and being willing as well!
LikeLiked by 1 person
I think that a brand new loom would probably stay in good condition for a long time and not require so much maintenance. Mine was quite a bit older than I realized, but still pretty in good shape considering. Thanks for reading and have a great day!
LikeLike
What a project! I am glad it turned out well for.
LikeLiked by 1 person
What a great blog post! Thank you for sharing how you restored your loom. I was gifted a Harrisville 22″ floor loom and I’m just starting to figure out what needs to be fixed/replaced. Customer service was wonderful at Harrisville Designs. Actually the woman their directed me to your website and blog! I’m hoping my loom will be as beautiful as yours. Enjoy!
LikeLiked by 1 person
Thank you for reading and I hope my info was helpful. I think the Harrisville looms are things of beauty and it is amazing how long they can last and work. Good luck refurbishing yours. I also recently ordered a new harness to replace the warped one.
LikeLike
thanks! I’m also restoring an HD loom, four harness, six shaft 22”. Thanks for including lots of helpful information.
LikeLiked by 1 person
Thanks for your comments! Since I wrote that post I have also ordered a new harness to replace the warped one. Amazing that the new ones are the same as the 50 year old ones. Hope you have a good week.
LikeLike
I just inherited the exact same loom from my grandma who died a year ago. I am so excited to get started on refurbishing it. It needs many of the same type of repairs that yours did. Where did you find the identifying characters stamped on your loom? I can’t find mine.
LikeLiked by 1 person
I am not at home now, and my loom is folded up while we prepare for a new flooring project. I think it was somewhere on the main frame part that the harnesses hang on. I think if you contact Harrisville Designs they may be able to help you. Have fun with your loom!
LikeLike